Setup Guide
Setting up the Flyy SDK in your Xcode project
Initialize SDK
Add Dependency
Within the target block of your project's Podfile, define the FlyyFramework dependency.
target 'yourxcodeproject' do
  pod 'FlyyFramework', '1.3.127'

end
Then, run the following command from the Terminal from the root of your Xcode project's directory to install the dependency.
pod install
If pod install fails for some reason, run pod update and pod repo update and try again.
Pair SDK with Dashboard
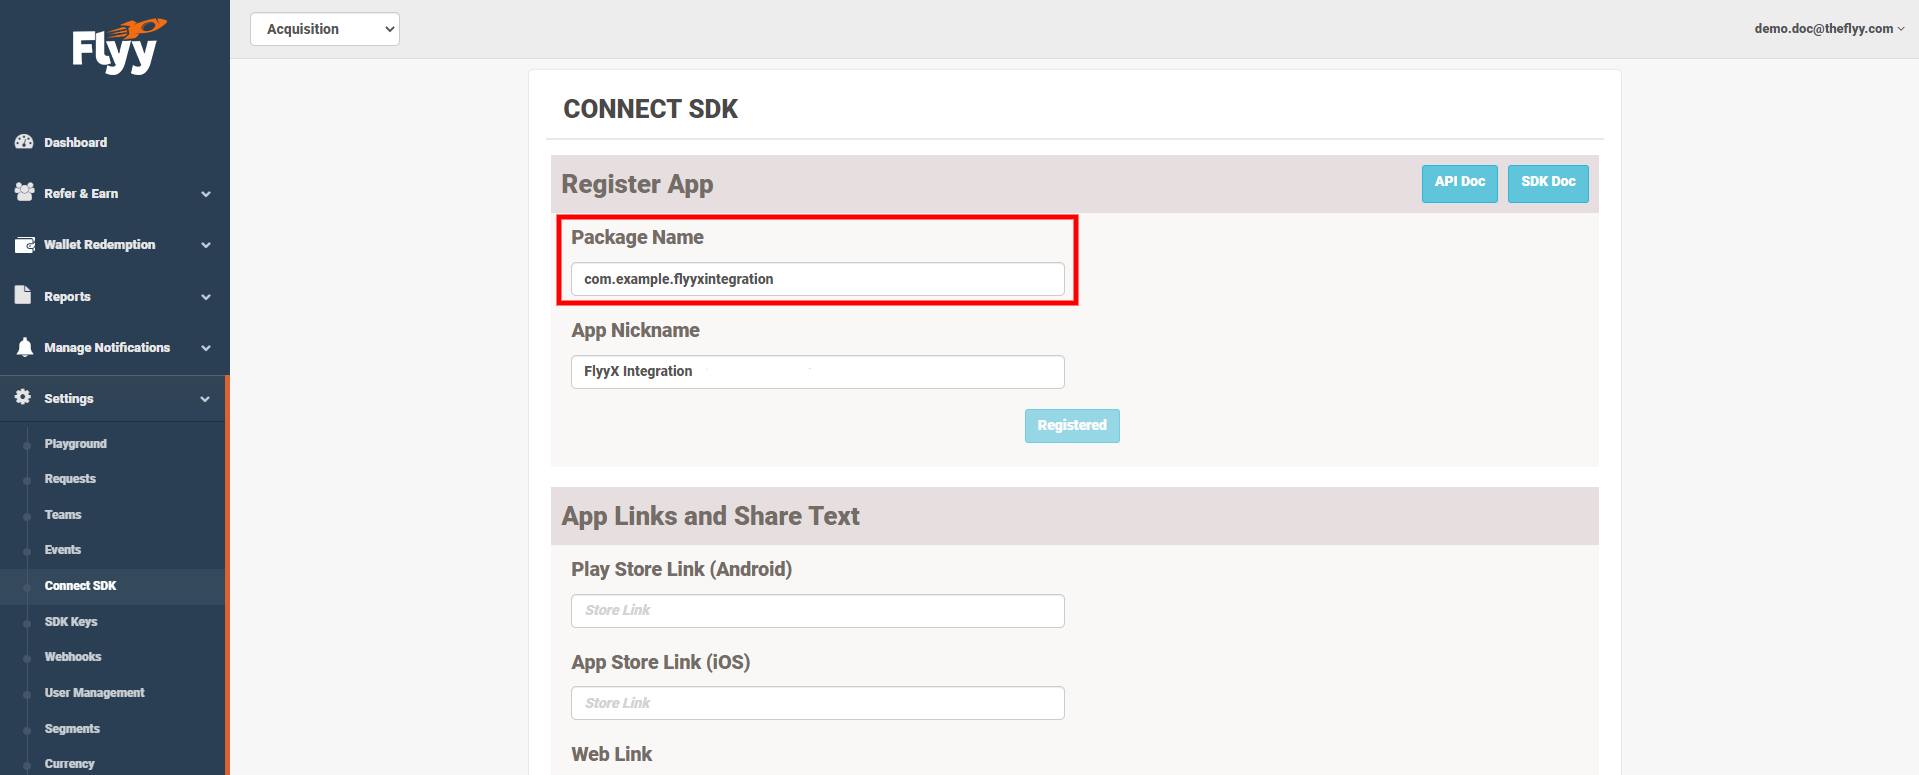
Register Package Name
Open your Flyy Dashboard and go to Settings > Connect SDK and register a Package Name.
Note
- The package name can be set to any desired string. It need not correspond to your iOS app's bundle identifier.
- Package name once registered cannot be edited.
Set Package Name
From the project's AppDelegate, call the setPackageName.
...
import FlyyFramework


@main
class AppDelegate: UIResponder, UIApplicationDelegate {

    func application(_ application: UIApplication, didFinishLaunchingWithOptions launchOptions: [UIApplication.LaunchOptionsKey: Any]?) -> Bool {
        ...

        Flyy.sharedInstance.setPackage(packageName: "com.example.flyyxintegration")

        ...
    }

    ...
}
...
@import FlyyFramework;


@interface AppDelegate ()

@end
//Declare Flyy Variable
Flyy *flyy;
@implementation AppDelegate


- (BOOL)application:(UIApplication *)application didFinishLaunchingWithOptions:(NSDictionary *)launchOptions {
    //Initialize flyy variable
    flyy = [Flyy sharedFlyyInstance];

    //Set Package name
    [flyy setPackageWithPackageName:@"com.example.flyyxintegration"];

    ...

    return YES;
}
Initialize SDK
The final step of initialization is to call the init and the setUser method.
Initialize the SDK in your project's AppDelegate. For integration purposes, set the environment as Flyy.FLYY_ENVIRONMENT_STAGING.
//For Stage
Flyy.sharedInstance.initSDK(partnerToken: "{partner_id}", environment: Flyy.FLYY_ENVIRONMENT_STAGING)

//For Production
Flyy.sharedInstance.initSDK(partnerToken: "{partner_id}", environment: Flyy.FLYY_ENVIRONMENT_PRODUCTION)
//For Stage
[flyy initSDKWithPartnerToken:@"{partner_id}" environment: [flyy staging]];

//For Production
[flyy initSDKWithPartnerToken:@"{partner_id}" environment: [flyy production]];
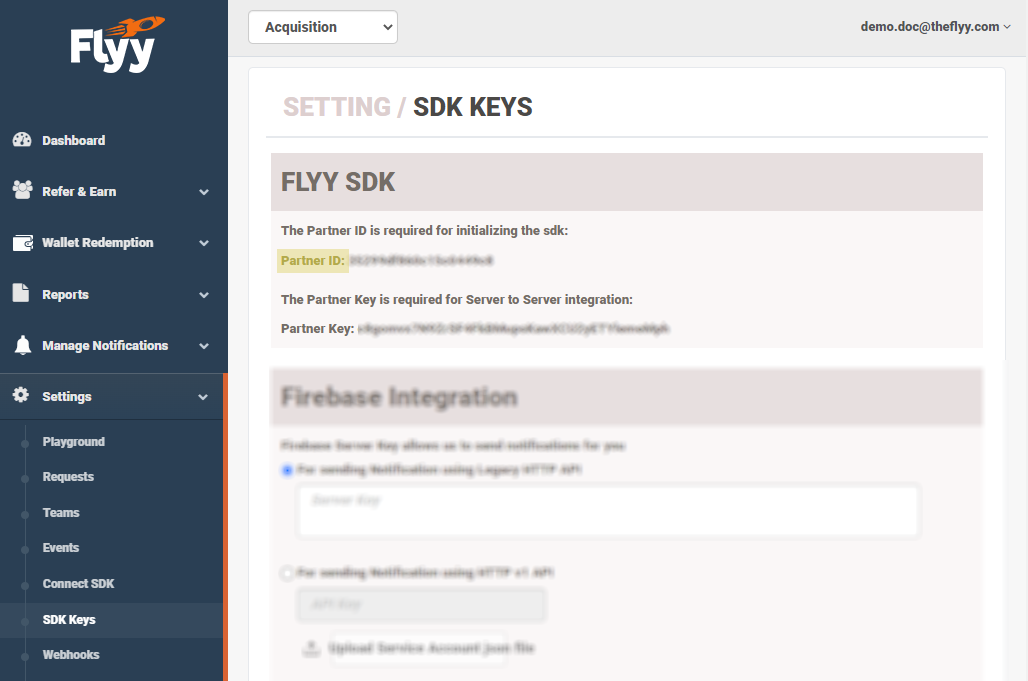
You can find your Partner ID in the Flyy Dashboard at Settings > SDK Keys.
Set User ID
To complete the initialization process, call the setUser method.
Since the user id is usually retrieved after the app's startup, the setUser should be called from a View Controller.
//Set User ID. During Login and every subsequent app open.
Flyy.sharedInstance.setUser(externalUserId: "unique_id")
//Set User ID. During Login and every subsequent app open.
[flyy setUserWithExternalUserId:@"unique_id"];
setUser must be called every time a user opens the app.
Note
unique_id can be any string that will be shown in reports. This must be unique and cannot be changed for any User later on.
To check whether the initialization was successful, open your Staging dashboard and go to Reports > Users. In case of successful integration, you should immediately see the newly created user in the Users Report. With that, this completes the SDK Initialization Process.
Add Flyy Widget (Optional)
The Flyy Widget is a UI element that provides a ready-to-use entry point leading to the Flyy SDK's Primary Screens. Adding the Flyy Widget is not required to complete the initialization process, but is recommended because it will allow you to test the SDK features readily.

Click here to follow the instructions to add Flyy Widget to your app. (Setup time <5 minutes)
Next, complete the steps below to manage notifications in order to complete the setup process.
Manage Notifications
Flyy SDK takes advantage of Firebase's Cloud Messaging (FCM) to display Push Notifications and show in-app popups such as scratch cards. Therefore, it is necessary to set up FCM in your Xcode project. To set up FCM in your app, follow its official guide and then continue with the steps below.
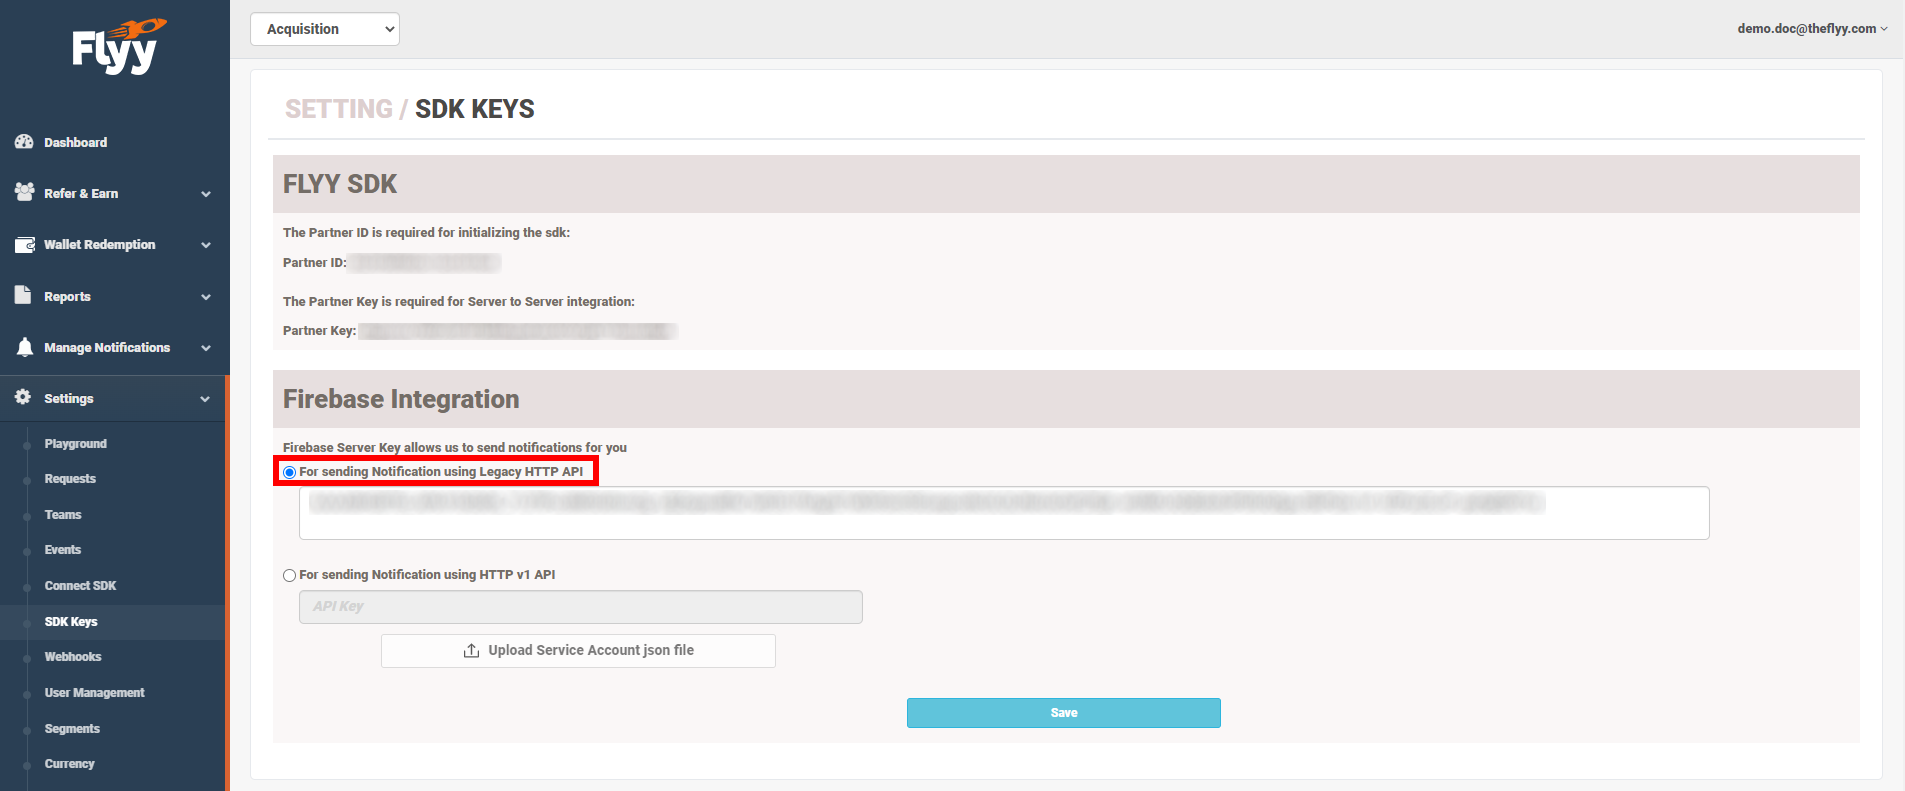
Add FCM Server Key
To enable Flyy to send FCM notifications to your app perform either of the two steps.
Legacy HTTP API
- Copy the Server Key from Project Settings > Cloud Messaging in your Firebase console.
- Then paste it into your Flyy dashboard at Settings > SDK Keys.
OR
HTTP v1 API
To use the newer API, the API requests must be authenticated using a Web API Key and a JSON Service Account Private Key. The below steps will guide you to get the API Key and JSON Key.
-
Provide API Key
-
Copy Web API Key from Project Settings > General in your Firebase console.
If this key is not yet generated, just perform the following two steps. Open Authentication and click Get Started. Go back to Project Settings > General to find the Web API Key generated. -
Paste the Web API Key in the API Key text box in your Flyy Dashboard at Settings > SDK Keys.
-
-
Upload JSON Key
- Generate new private key from Project Settings > Service accounts.
- Then, in your Flyy Dashboard, click Upload Service Account json file to upload the downloaded JSON file.
Click Save.
Send FCM Token to Flyy's Server
Within the MessagingDelegate's messaging(_:didReceiveRegistrationToken:) add the sendFcmTokenToServer method. This will ensure that Flyy's server receive the updated FCM token every time it is refreshed.
extension AppDelegate : MessagingDelegate
{
    // [START refresh_token]
    func messaging(_ messaging: Messaging, didReceiveRegistrationToken fcmToken: String?)
    {
        let token = fcmToken!
        if (!token.isEmpty) {
          	//Send FCM Token to Server
            Flyy.sharedInstance.sendFcmTokenToServer(fcmToken: token)
        }

        let dataDict:[String: String?] = ["token": fcmToken]
        NotificationCenter.default.post(name: Notification.Name("FCMToken"), object: nil, userInfo: dataDict)
    }
}
- (void)messaging:(FIRMessaging *)messaging didReceiveRegistrationToken:(NSString *)fcmToken {
    NSLog(@"FCM registration token: %@", fcmToken);
    // Notify about received token.
    NSDictionary *dataDict = [NSDictionary dictionaryWithObject:fcmToken forKey:@"token"];

    NSString *token = fcmToken;
    if (token != (id)[NSNull null] || token.length != 0) {
        //Send Token to FCM Server
        [flyy sendFcmTokenToServerWithFcmToken:(token)];
    }
    [[NSNotificationCenter defaultCenter] postNotificationName:
     @"FCMToken" object:nil userInfo:dataDict];
}
Redirect Flyy Notifications to the SDK
Within UNUserNotificationCenterDelegate's delegate methods add the following code to redirect notifications originating from the source "flyy_sdk" to the Flyy SDK. This will let the SDK display in-app scratch cards.
extension AppDelegate : UNUserNotificationCenterDelegate
{
    // For handling background notifications in the background.
    func userNotificationCenter(_ center: UNUserNotificationCenter,
                                didReceive response: UNNotificationResponse,
                                withCompletionHandler completionHandler: @escaping
                                () -> Void)
    {
        let userInfo = response.notification.request.content.userInfo
        if let notificationSource = userInfo["notification_source"]
        {
            if notificationSource as! String == "flyy_sdk"
            {
                Flyy.sharedInstance.handleBackgroundNotification(userInfo: userInfo)
            }
        }
        completionHandler()
    }


    // For handling foreground notifications in the foreground.
    func userNotificationCenter(_ center: UNUserNotificationCenter,
                                willPresent notification: UNNotification,
                                withCompletionHandler completionHandler: @escaping (UNNotificationPresentationOptions) -> Void)
    {
        let userInfo = notification.request.content.userInfo
        Messaging.messaging().appDidReceiveMessage(userInfo)
        if let notificationSource = userInfo["notification_source"]
        {
            if notificationSource as! String == "flyy_sdk"
            {
                Flyy.sharedInstance.handleForegroundNotification(userInfo: userInfo)
            }
        }
        completionHandler([[.alert, .sound]])
    }
}
// Handle incoming notification messages while app is in the foreground.
- (void)userNotificationCenter:(UNUserNotificationCenter *)center
       willPresentNotification:(UNNotification *)notification
         withCompletionHandler:(void (^)(UNNotificationPresentationOptions))completionHandler {
    NSDictionary *userInfo = notification.request.content.userInfo;

    //Handle Foreground Notification
    NSString *notificationSource = [userInfo valueForKey:@"notification_source"];
    if (notificationSource != nil && [notificationSource isEqualToString:@"flyy_sdk"])
    {
        flyy = [Flyy sharedFlyyInstance];
        [flyy handleForegroundNotificationWithUserInfo:userInfo];
    }

    completionHandler(UNNotificationPresentationOptionBadge | UNNotificationPresentationOptionList | UNNotificationPresentationOptionBanner);
}

// Handle notification messages after display notification is tapped by the user.
- (void)userNotificationCenter:(UNUserNotificationCenter *)center
didReceiveNotificationResponse:(UNNotificationResponse *)response
         withCompletionHandler:(void(^)(void))completionHandler {
    NSDictionary *userInfo = response.notification.request.content.userInfo;

    //Handle Background Notification
    NSString *notificationSource = [userInfo valueForKey:@"notification_source"];
    if (notificationSource != nil && [notificationSource isEqualToString:@"flyy_sdk"])
    {
        flyy = [Flyy sharedFlyyInstance];
        [flyy handleBackgroundNotificationWithUserInfo:userInfo];
    }

    completionHandler();
}
This completes the Setup for your Xcode project.
Updated over 1 year ago
What’s Next
Take a step-by-step guide on how to create and redeem your first Offer